Convert squid log timestamps to a human readable format:
cat access.log | perl -p -e 's/^([0-9]*)/"[".localtime($1)."]"/e'
Looking to host a Squid server? Contact VMDK Hosting.
www.tediosity.com
Convert squid log timestamps to a human readable format:
cat access.log | perl -p -e 's/^([0-9]*)/"[".localtime($1)."]"/e'
Looking to host a Squid server? Contact VMDK Hosting.
This error occurs when there is a problem with an IP in one of the services located in ESXi firewall.
The IPs entered into the GUI will all look correct and you have exhausted all possibility.
The root cause is usually that you have entered individual IPs in CIDR format with a /32. ESXi does not like this.
How to correct the problem:
1) SSH to the ESXi host and edit /etc/vmware/esx.conf
2) Remove the /32 from all IP entries for the firewall (see below). Be sure to leave all larger CIDR annotations in place (/24, /27, /28, /16, etc.)
3) Reboot!
/firewall/services/webAccess/allowedip[0000]/ipstr = “192.168.10.10/32” <- Bad Entry – remove the /32
/firewall/services/webAccess/allowedip[0001]/ipstr = “10.10.20.0/24” <- Good Entry
Use the following ‘awk’ command to remove all blank lines from a file:
awk ‘NF > 0’ filename
Decode UPS Tracking Number
TRACKING #: 1Z XXX XXX YY ZZZZ ZZZC
X = Shipper’s Account # (6 Digits)
Y = Service Code (2 Digits) (See Partial Key Below)
Z = Shipper’s Reference # (Can be set by shipper for convenience, to mirror an invoice#, etc.)
C = Check Digit
Service Codes
01 UPS United States Next Day Air (“Red”)
02 UPS United States Second Day Air (“Blue”)
03 UPS United States Ground
12 UPS United States Third Day Select
13 UPS United States Next Day Air Saver (“Red Saver”)
15 UPS United States Next Day Air Early A.M.
22 UPS United States Ground – Returns Plus – Three Pickup Attempts
32 UPS United States Next Day Air Early A.M. – COD
33 UPS United States Next Day Air Early A.M. – Saturday Delivery, COD
41 UPS United States Next Day Air Early A.M. – Saturday Delivery
42 UPS United States Ground – Signature Required
44 UPS United States Next Day Air – Saturday Delivery
66 UPS United States Worldwide Express
72 UPS United States Ground – Collect on Delivery
78 UPS United States Ground – Returns Plus – One Pickup Attempt
90 UPS United States Ground – Returns – UPS Prints and Mails Label
A0 UPS United States Next Day Air Early A.M. – Adult Signature Required
A1 UPS United States Next Day Air Early A.M. – Saturday Delivery, Adult Signature Required
A2 UPS United States Next Day Air – Adult Signature Required
A8 UPS United States Ground – Adult Signature Required
A9 UPS United States Next Day Air Early A.M. – Adult Signature Required, COD
AA UPS United States Next Day Air Early A.M. – Saturday Delivery, Adult Signature Required, COD
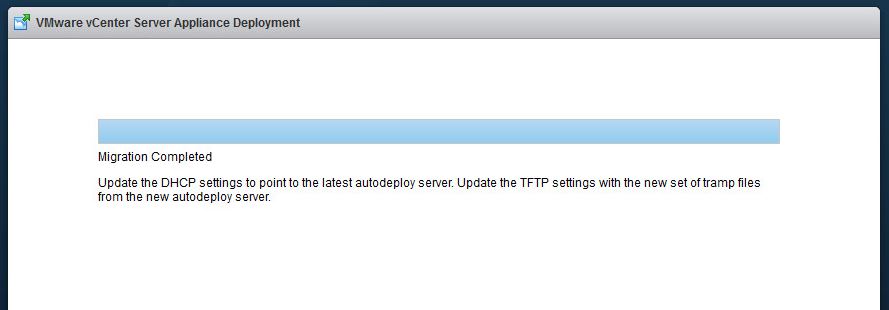
While attempting to upgrade your vCSA 5.5 to 6.0 you are confronted with this error:
Migration Failed Failed to download vCenter Server Support Bundle Logs
Make sure that your reverse and forward DNS match (not sure why VMware continues to insist on flawless DNS – Tedious!)
The solution to his upgrade error is to:
1. Truncate your databases
Truncate your databases using this command:
/opt/vmware/vpostgres/current/bin/psql -U postgres -t -d VCDB -c “select ‘truncate table ‘ || table_name || ‘ cascade;’ from information_schema.tables where table_name like ‘vpx_hist_stat%’ and table_type = ‘BASE TABLE’ order by 1” | /opt/vmware/vpostgres/current/bin/psql -U postgres -d VCDB
2. Make sure to tick the box to export your performance data
Success:
Connect to the vCenter Server Appliance via its console or via SSH.
Run the vdcadmintool service tool:
/usr/lib/vmware-vmdir/bin/vdcadmintool
The console will load:
================================
Please select:
0. exit
1. Test LDAP connectivity
2. Force start replication cycle
3. Reset account password
4. Set log level and mask
5. Set vmdir state
================================
Press #3
When prompted for the Account DN, enter:
cn=administrator,cn=users,dc=vSphere,dc=local
A new password will be displayed.
This
You are in the process of trying to upgrade an existing vCenter 5.5 vCSA to 6.0.
Make note that it is asking for ESXi host to install the vCSA and not vCenter!

Use this method to install a working Repo to a VMware Appliance (i.e. VCSA, vSphere Replication, vCloud Usage Meter, etc.)
# cat /etc/SuSE-release
SUSE Linux Enterprise Server 11 (x86_64)
VERSION = 11
PATCHLEVEL = 2
Add the repository for the appropriate version
http://download.opensuse.org/distribution/[VERSION]/repo/oss/
# zypper addrepo -f http://download.opensuse.org/distribution/11.2/repo/oss/ opensuse
Once the Repository is loaded, simply load Yast:
# yast
If you want to install a firewall on your appliance, scroll to Security -> Firewall and follow the prompts.
You have two options for managing the LSI Logic, Dell PERC, etc. from the ESXi CLI: StorCLI or MegaCLI.
You can download MegaCLI for VMware here: 8.04.07_MegaCLI
You can download StorCLI from the LSI website and here: CLI_VMWare_MN_8.04.07
MegaCLI:
esxi1# ./MegaCli -LDSetProp -Cached -LAll -aAll
Set Cache Policy to Cached on Adapter 0, VD 0 (target id: 0) success
Set Cache Policy to Cached on Adapter 1, VD 0 (target id: 0) success
esxi1# ./MegaCli -LDSetProp EnDskCache -LAll -aAll
Set Disk Cache Policy to Enabled on Adapter 0, VD 0 (target id: 0) success
Set Disk Cache Policy to Enabled on Adapter 1, VD 0 (target id: 0) success
esxi1# ./MegaCli -LDSetProp RA -LALL -aALL
Set Read Policy to ReadAhead on Adapter 0, VD 0 (target id: 0) success
For those who have good power:
esxi1# ./MegaCli -LDSetProp WB -LALL -aALL
Set Write Policy to WriteBack on Adapter 0, VD 0 (target id: 0) success
Set Write Policy to WriteBack on Adapter 1, VD 0 (target id: 0) success
For those that live in fear, run the above command and also:
esxi1# ./MegaCli -LDSetProp NoCachedBadBBU -LALL -aALL
Set No Write Cache if bad BBU on Adapter 0, VD 0 (target id: 0) success
Set No Write Cache if bad BBU on Adapter 1, VD 0 (target id: 0) success
StorCLI:
Show all:
./storcli /c0 show all
Enable WriteBack Cache:
./storcli /c0/v0 set wrcache=AWB
Enable IOCache:
./storcli /c0/v0 set iopolicy=cached
Not recommended see:
Enable Physical Disk Drive Cache:
./storcli /c0/v0 set pdcache=On
Read Ahead
./storcli /c0/v0 set rdcache=RA or NoRA
When first using VMware PowerCLI, you will need to add functions that are associated with your profile.
Create a new profile:
PowerCLI> New-item –type file –force $profile
Once your profile has been created, you can now add functions by typing:
PowerCLI> notepad $profile
The above command simply opens notepad and allows you to edit your profile directly.
Once you have added functions, you will need to reload your profile (or restart PowerCLI):
PowerCLI> .$profile