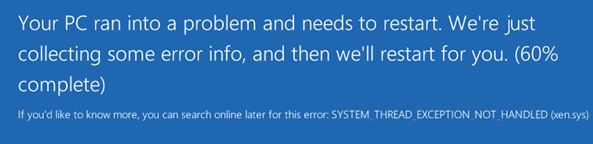
XymonQV – Xymon Android App

Upon purchasing a new phone, I discovered that XymonQV was no longer in the Google Play store and the link on GitHub was 404.

I was able to export the installed app from an old phone.

If you need the XymonQV Android App, you download it here:   XymonQV Android App

This is a copy of the app that was installed from the Google Play store and has not been modified in any way.


SSHD mm_request_send: write: Broken pipe

You are attempting to login to a Linux machine (probably CentOS) and your SSH sessions are instantly disconnected.

/var/log/secure shows various Signal 15 crashes and this error:

mm_request_send:  write:  Broken pipe

Your box has been hacked.    Format and Reinstall.

Be sure to run “yum update” at frequent intervals to keep your servers/VMs up-to-date!!


Connect Error (2000) mysqld cannot connect to MySQL 4.1+ using old authentication ERROR 2049 (HY000): Connection using old (pre-4.1.1) authentication protocol refused

You are receiving these errors:

Connect Error (2000) mysqld cannot connect to MySQL 4.1+ using old authentication
ERROR 1275 (HY000): Server is running in –secure-auth mode, but ‘dbname’@’localhost’ has a password in the old format; please change the password to the new format
ERROR 2049 (HY000): Connection using old (pre-4.1.1) authentication protocol refused (client option 'secure_auth' enabled)
ERROR 1372 (HY000): Password hash should be a 16-digit hexadecimal number

Your system is definitely storing passwords in the new format.     You are going crazy because your database is offline.

UPDATE mysql.user SET Password = PASSWORD(‘cheese’) WHERE User = ‘test’ AND Host = ‘localhost’;
UPDATE mysql.user SET plugin = ‘mysql_native_password’ WHERE User = ‘test’ AND Host = ‘localhost’;
flush privileges;

Windows 2012 R2 SYSTEM_THREAD_EXCEPTION_NOT_HANDLED (xen.sys)

xen.sys

You are trying to start a Windows 2012 R2 server on a VMware infrastructure.

What you do (or don’t) realize is that this VM is heavily tainted by a Citrix Xen basket of fun.

Procedure to fix this tediosity:

  1.  Snapshot the VM
  2. Boot into Safe Mode
  3. Open Device Manager (Show Hidden Devices)
  4. Go through each section and delete all Xen devices (yes, to delete driver)
  5. Reboot.   The machine should boot normally without safe mode.
  6. Control Panel -> Remove Programs
  7. Remove ALL of the Citrix programs and drivers
  8. Install VMware tools

You have just been saved hours of agony.

Are you looking to migrate your XEN VMs to VMware? Contact VMDK Hosting.

Call “HostFirewallSystem.UpdateRuleset” for object firewallSystem

This error occurs when there is a problem with an IP in one of the services located in ESXi firewall.

The IPs entered into the GUI will all look correct and you have exhausted all possibility.

The root cause is usually that you have entered individual IPs in CIDR format with a /32.   ESXi does not like this.

How to correct the problem:

1)  SSH to the ESXi host and edit /etc/vmware/esx.conf

2) Remove the /32 from all IP entries for the firewall (see below).   Be sure to leave all larger CIDR annotations in place (/24, /27, /28, /16, etc.)

3) Reboot!


/firewall/services/webAccess/allowedip[0000]/ipstr = “192.168.10.10/32”  <- Bad Entry – remove the /32
/firewall/services/webAccess/allowedip[0001]/ipstr = “10.10.20.0/24”  <- Good Entry


Identify UPS Account From Tracking Number – Decode UPS Tracking Number

Decode UPS Tracking Number

TRACKING #: 1Z XXX XXX YY ZZZZ ZZZC

X = Shipper’s Account # (6 Digits)
Y = Service Code (2 Digits) (See Partial Key Below)
Z = Shipper’s Reference # (Can be set by shipper for convenience, to mirror an invoice#, etc.)
C = Check Digit

Service Codes

01 UPS United States Next Day Air (“Red”)
02 UPS United States Second Day Air (“Blue”)
03 UPS United States Ground
12 UPS United States Third Day Select
13 UPS United States Next Day Air Saver (“Red Saver”)
15 UPS United States Next Day Air Early A.M.
22 UPS United States Ground – Returns Plus – Three Pickup Attempts
32 UPS United States Next Day Air Early A.M. – COD
33 UPS United States Next Day Air Early A.M. – Saturday Delivery, COD
41 UPS United States Next Day Air Early A.M. – Saturday Delivery
42 UPS United States Ground – Signature Required
44 UPS United States Next Day Air – Saturday Delivery
66 UPS United States Worldwide Express
72 UPS United States Ground – Collect on Delivery
78 UPS United States Ground – Returns Plus – One Pickup Attempt
90 UPS United States Ground – Returns – UPS Prints and Mails Label
A0 UPS United States Next Day Air Early A.M. – Adult Signature Required
A1 UPS United States Next Day Air Early A.M. – Saturday Delivery, Adult Signature Required
A2 UPS United States Next Day Air – Adult Signature Required
A8 UPS United States Ground – Adult Signature Required
A9 UPS United States Next Day Air Early A.M. – Adult Signature Required, COD
AA UPS United States Next Day Air Early A.M. – Saturday Delivery, Adult Signature Required, COD

vCSA 5.5 Upgrade to 6.0 Migration Failed Failed to download vCenter Server Support Bundle Logs

While attempting to upgrade your vCSA 5.5 to 6.0 you are confronted with this error:

Migration Failed Failed to download vCenter Server Support Bundle Logs

Make sure that your reverse and forward DNS match (not sure why VMware continues to insist on flawless DNS – Tedious!)

The solution to his upgrade error is to:

1. Truncate your databases

Truncate your databases using this command:

/opt/vmware/vpostgres/current/bin/psql -U postgres -t -d VCDB -c “select ‘truncate table ‘ || table_name || ‘ cascade;’ from information_schema.tables where table_name like ‘vpx_hist_stat%’ and table_type = ‘BASE TABLE’ order by 1” | /opt/vmware/vpostgres/current/bin/psql -U postgres -d VCDB

2. Make sure to tick the box to export your performance data

Success:

vCSA 6.0 migration complete

Reset administrator@vsphere.local password vCSA 5.5

Connect to the vCenter Server Appliance via its console or via SSH.

Run the vdcadmintool service tool:

/usr/lib/vmware-vmdir/bin/vdcadmintool

The console will load:

================================
Please select:
0. exit
1. Test LDAP connectivity
2. Force start replication cycle
3. Reset account password
4. Set log level and mask
5. Set vmdir state
================================

Press #3

When prompted for the Account DN, enter:

cn=administrator,cn=users,dc=vSphere,dc=local

A new password will be displayed.

This